
Cookie Cutter Bird Feeders
Ingredients:
4 cups bird seed
3/4 cup flour
3 T. Corn Syrup
1/2 cup water
String or Yarn

Mix all ingredients together in a bowl. Press a layer of the mix into a cookie cutter. Press a string into the mix for a hanger.

Then fill the rest of the cookie cutter with mix. Pop it out of the cookie cutter when it is dry. It will take about 4-6 hours to dry. This recipe makes approximately 12 bird feeders depending on the size of your cookie cutters.

I love how dried flowers look. If you put them in a bookmark they do not get seen very often, for they are hiding in your book. So I decided a good way to display them was as a suncatcher. The kids loved collecting the flowers and figuring out just how to arrange them perfectly! We keep our up all year!
Dried Flower Suncatchers

You need:
-Popsicle Sticks
-Contact Paper
-Small, flat flowers and leaves
-Glue
-Ribbon
Directions:
Cut two small squares of contact paper the length of the popsicle sticks, about 4X4 inches.
Peel the paper off one of the pieces of contact paper. Arrange your flowers and leaves how you want them to look on the sticky side of the contact paper. Peel the paper off the other piece of contact paper and stick it carefully to the flowers. Press any air bubble out between the flowers and leaves. Glue the popsicle sticks around the edges to frame your suncatcher. You may decorate the sticks if you wish or you could use real sticks from trees to give a more natural look. Add a ribbon for a a hanger.
Jan. 20, 2014 Foamy Floam is so fun to play with and not messy! I love that the kids can play and shape it and be creative with it and it doesn't make a mess! I found this recipe online.
Foamy Floam
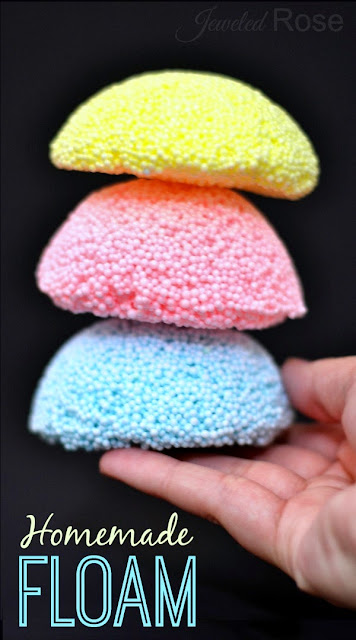
Check out Homemade Floam here
Jan. 22, 2014
Here is a two fun winter projects for preschool age.


Jan. 24, 2015
SNOW PAINTING

.jpg)
When there is lots of snow out there is lots of fun to be had. After awhile just making snowmen, snow angels and snow forts gets a little boring. Since winter lasts for months and months where we live, we need a few new ideas here and there. So here the girls are "painting" in the snow. We filled a few water spray bottles with water and food coloring. They used them to "paint" the snow! They had a blast coloring the snow rainbow colors!
Jan. 27, 2015
I made this tree for Valentine's Day. You can put pictures of your family or add extended family if you want too. It is a tree branch nestled in a painted flower pot!
Valentine's Family Photo Tree
.jpg)
You need: -Clay flower pot
-White paint
-tree branch (with lots of little branches)
-mini clothespins
-heart candy or red hot candies
-Styrofoam cup
-metal rimmed tags
-photographs
-circle punch
-Stickers (optional)
Directions: First you need to paint the outside and inside of you flower pot
Next you will take your Styrofoam cup and place it upside down in your flower pot. This is your filler so you don't have to use as many heart candies to fill the pot. You can also secure your branch by poking it into the cup. Fill the flower pot with candies. Then you are going to work on your tags. I used metal rimmed ones. You could purchase some at at local craft store in the scrapbook section or you could make your own. I have a circle punch so I punched out the heads of my photographs. If you don't have a circle punch, you could just trace a circle shape and cut them out by hand. Glue your photograph circles on your metal rimmed tags and hang them on the branches of your tree branch. I also added names on the back of the tags. You could always put photographs on both sides if you wanted. I added the mini clothespins for a fun touch. The LOVE on the flower pot was added with stickers. You could just paint it on and save a few bucks!
No comments:
Post a Comment